
One of my favorite hobbies is reverse engineering 16-bit x86 DOS games. Being able to step through their code as they’re running and set breakpoints is a majorly useful tool. I was using DOSBox and the normal DOS DEBUG command to do this, until recently when I discovered that DOSBox has a debug build. I searched online and found a downloadable version of DOSBox that was built with the debug feature enabled. Then, I learned there was a “Heavy Debug” version that included additional debugging functionality (such as setting breakpoints when a memory location changes). I couldn’t find a prebuilt “Heavy Debug” version of DOSBox quickly, so I decided to figure out how to download the source code for DOSBox and compile it with the “Heavy Debug” feature enabled myself. This is a step-by-step “walkthrough” of what I learned. If this serves no other purpose, it will help my future-self figure out how to do this again if I need to. 😁
The main site I used while figuring all this out was https://www.dosbox.com/wiki/Building_DOSBox_with_MinGW.
Overview
- Install MinGW (“A native Windows port of the GNU Compiler Collection (GCC)”)
- Download, compile, and install libraries that DOSBox needs to compile
- Download, compile, and install DOSBox
Install MinGW
- Download MinGW installer from http://sourceforge.net/projects/mingw/.
- Run MinGW installer, accepting the defaults (I changed the install directory to “D:\MinGW\” instead of “C:\MinGW\”.
- When the MinGW Installation Manager opens, select “mingw-developer-toolkit”, “mingw32-base”, “mingw32-gcc-g++”, and “, “msys-base”
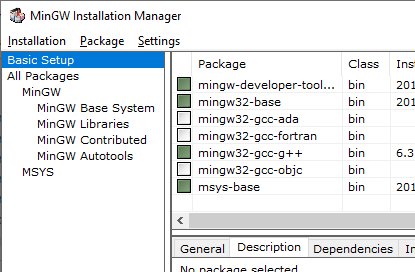
- Open the Installation menu and select Apply Changes. This will download and install the packages you selected. When this finishes, close MinGW Installation Manager.
- Browse to D:\MinGW\msys\1.0\ and run MSYS.BAT. This will open the MinGW terminal window.

- The site I was following the instructions on said to enter the command mount D:\MinGW\msys\1.0 /mingw, however I found that the /mingw directory already had my D:\MinGW\msys\1.0 folder mounted. I didn’t need to run the mount command.
Installing libraries needed by DOSBox
The following library are either needed or are optional. I chose to include them.
- SDL (Simple DirectMedia Layer)
- Direct Draw support
- Networking support
- Screenshot support
- Compressed audio on disk images support
- Debugger support (the main reason I went through all this)
- SDL
- Download http://www.libsdl.org/release/SDL-devel-1.2.15-mingw32.tar.gz to D:\MinGW\msys\1.0\home\your-user-name\
- In MinGW terminal:
tar xvf SDL-devel-1.2.15-mingw32.tar.gz
cd SDL-1.2.15
make install-sdl prefix=/mingw
cd ..
- Direct Draw support
- Download http://www.libsdl.org/extras/win32/common/directx-devel.tar.gz to D:\MinGW\msys\1.0\home\your-user-name\
- In MinGW terminal:
tar xvf directx-devel.tar.gz -C /mingw
- Networking support
- Download https://www.libsdl.org/projects/SDL_net/release/SDL_net-1.2.8.tar.gz to D:\MinGW\msys\1.0\home\your-user-name\
- In MinGW terminal:
tar xvf SDL_net-1.2.8.tar.gz
cd SDL_net-1.2.8
./configure –prefix=/mingw - Edit the file D:\MinGW\msys\1.0\home\your-user-name\SDL_net-1.2.8\SDLnet.c and add the line
#include <winerror.h>
at the top. - In MinGW terminal:
make
make install
cd ..
- Screenshot support
- Download http://sourceforge.net/projects/libpng/files/zlib/1.2.8/zlib-1.2.8.tar.xz/download to D:\MinGW\msys\1.0\home\your-user-name\
- In MinGW terminal:
tar xvf zlib-1.2.8.tar.xz
cd zlib-1.2.8
make -f win32/Makefile.gcc
cp libz.a /mingw/lib/
cp zlib.h zconf.h /mingw/include/
cd .. - Download https://sourceforge.net/projects/libpng/files/libpng16/older-releases/1.6.18/libpng-1.6.18.tar.xz/download to D:\MinGW\msys\1.0\home\your-user-name\
- In MinGW terminal:
tar xvf libpng-1.6.18.tar.xz
cd libpng-1.6.18
./configure –disable-shared –prefix=/mingw
make - The make command will fail, but it will generate a file you need to edit in order to make the make command succeed. The site I was following didn’t mention running make after ./configure. It just said to edit the file, but it didn’t exist for me. I ended up trying to run make and seeing it fail, then noticed the file now existed. Apparently running make generated the file.
- Edit the file D:\MinGW\msys\1.0\home\your-user-name\libpng-1.6.18\pnglibconf.h and at the bottom of the file, add ” \” (space followed by a backslash, without the quotes) to the end of the following lines:
#define PNG_TEXT_Z_DEFAULT_COMPRESSION \
#define PNG_TEXT_Z_DEFAULT_STRATEGY \
#define PNG_ZLIB_VERNUM \
#define PNG_Z_DEFAULT_COMPRESSION \
#define PNG_Z_DEFAULT_NOFILTER_STRATEGY \
#define PNG_Z_DEFAULT_STRATEGY \ - In MinGW terminal:
make
make install
cd ..
- Compressed audio on disk images support
- Download http://downloads.xiph.org/releases/ogg/libogg-1.3.2.tar.gz to D:\MinGW\msys\1.0\home\your-user-name\
- In MinGW terminal:
tar xvf libogg-1.3.2.tar.gz
cd libogg-1.3.2
./configure –disable-shared –prefix=/mingw
make
make install
cd . - Download http://downloads.xiph.org/releases/vorbis/libvorbis-1.3.5.tar.gz to D:\MinGW\msys\1.0\home\your-user-name\
- In MinGW terminal:
tar xvf libvorbis-1.3.5.tar.gz
cd libvorbis-1.3.5
./configure –disable-shared –prefix=/mingw
make
make install
cd .. - Download https://www.icculus.org/SDL_sound/downloads/SDL_sound-1.0.3.tar.gz to D:\MinGW\msys\1.0\home\your-user-name\
- In MinGW terminal:
tar xvf SDL_sound-1.0.3.tar.gz
cd SDL_sound-1.0.3
./configure –disable-shared –prefix=/mingw LIBS=”-lvorbisfile -lvorbis -logg”
make
make install
cd ..
- Debugger support
- Download http://sourceforge.net/projects/pdcurses/files/pdcurses/3.4/PDCurses-3.4.tar.gz to D:\MinGW\msys\1.0\home\your-user-name\
- In MinGW terminal:
tar xvf PDCurses-3.4.tar.gz
cd PDCurses-3.4/win32
make -f gccwin32.mak DLL=N
cp pdcurses.a /mingw/lib/libpdcurses.a
cd ..
cp curses.h panel.h /mingw/include/
cd ..
Building DOSBox
- Download http://source.dosbox.com/dosboxsvn.tgz to D:\MinGW\msys\1.0\home\your-user-name\
- In MinGW terminal:
tar xvf dosboxsvn.tgz
cd dosbox
./autogen.sh
./configure –enable-core-inline –enable-debug=heavy LDFLAGS=”-static-libgcc -static-libstdc++ -s” LIBS=”-lvorbisfile -lvorbis -logg”
make - Make a DOSBox folder where you want DOSBox to be.
- Copy the following files to your the DOSBox folder you just created:
D:\MinGW\msys\1.0\home\your-user-name\dosbox\src\dosbox.exe
D:\MinGW\msys\1.0\home\your-user-name\SDL-1.2.15\bin\SDL.dll
D:\MinGW\msys\1.0\home\your-user-name\SDL_net-1.2.8\.libs\SDL_net.dll - Run dosbox.exe to start DOSBox.
- I actually renamed dosbox.exe to dosbox-debug.exe and copied it to my already existing DOSBox folder so it would use the DOSBox configuration I already had set up. The two files SDL.dll and SDL_net.dll already existed in my DOSBox folder, so I didn’t copy them over. I’m not sure if this meant I could have skipped downloading/compiling/installing them, or if they were needed by the DOSBox build process.

Conclusion
This turned out to be fairly straight forward and I didn’t hit many problems. The few minor problems I ran into, I commented about above. Now I just need to learn how to use DOSBox’s debugger. Maybe I’ll write another post about that. 🙂

Thanks for this guide. I have an interest in compiling my own DOSBox SVN custom builds, but I do not need the heavy debug (or any debug) mode enabled. Would I just use a standard ./configure command, and leave the rest of that line out? Or do I keep the whole line and just remove the part that says “–enable-debug=heavy”?
I haven’t messed with this in quite a while, but my guess would be that you don’t need the Debugger support libraries, and when compiling DOSBox you could just leave off the “–enable-debug=heavy” and include everything else.
Thanks, that worked. Your guide was very helpful, particularly the part about patching the pnglibconf.h file, which was not very clear in the main DOSBox wiki.
Glad it was helpful! 😃